The World Wide Web Consortium's specification for Extensible Stylesheet Language (XSL) comes in two parts:
XSL Formatting Objects is itself an XML-based markup language that lets you specify in great detail the pagination, layout, and styling information that will be applied to your content. The XML FO markup is quite complex. It is also verbose; virtually the only practical way to produce an XML FO file is to use XSLT to produce a source document. Finally, once you have this XML FO file, you need some way to render it on an output medium. There are few tools available to do this final step.
Rather than explain XSL FO in its entirety, these notes will give you enough information to use the major features of XSL FO. Our case study will be a short review handbook of Spanish that will be printed as an insert for a Spanish language learning CD-ROM. We'll use the Apache Software Foundation's FOP tool to convert the FO file to a PDF file.
The XSL FO file will be an XML document, it will
begin with the standard XML processing instruction and
the FO <fo:root> element. It's a convention
for people to use fo as a namespace prefix,
and that's what we're doing here.
<?xml version="1.0" encoding="utf-8"?>
<fo:root xmlns:fo="http://www.w3.org/1999/XSL/Format">
The structure of the remainder of the document is:
After the FO document's beginning <fo:root> tag,
we have to describe what kinds of pages our document can have. Our
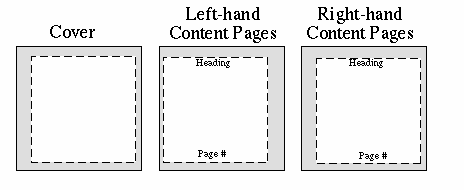
document will have three kinds of pages shown in the diagram below. To
accommodate the stapling area, the cover page and right-hand pages will
have more margin space at the left. The content pages will also have a
region for a header and footer.

Let's start out by specifying the page widths and heights and
margins for all three types of pages. The units below are all in
centimeters, but you may use any of the CSS units, such as px (pixel),
pt (point), em, in, mm, etc. Each of these specifications is called a
simple-page-master and must be given a
master-name so you can refer to it later.
<fo:layout-master-set>
    <fo:simple-page-master master-name="cover"
        page-height="12cm"
        page-width="12cm"
        margin-top="0.5cm"
        margin-bottom="0.5cm"
        margin-left="1cm"
        margin-right="0.5cm">
    </fo:simple-page-master>

    <fo:simple-page-master master-name="leftPage"
        page-height="12cm"
        page-width="12cm"
        margin-left="0.5cm"
        margin-right="1cm"
        margin-top="0.5cm"
        margin-bottom="0.5cm">
    </fo:simple-page-master>

    <fo:simple-page-master master-name="rightPage"
        page-height="12cm"
        page-width="12cm"
        margin-left="1cm"
        margin-right="0.5cm"
        margin-top="0.5cm"
        margin-bottom="0.5cm">
    </fo:simple-page-master>

    <!-- more info will go here -->
</fo:layout-master-set>
The margins are areas which will not contain any printed output.
All of the printing occurs within the dotted lines shown in the preceding diagram. This is the page content area (officially called the page-reference-area), which can be divided into five regions as shown below.
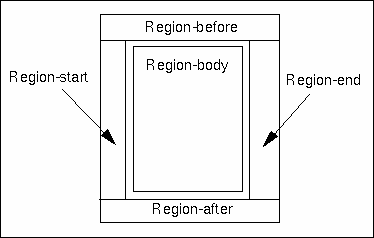
Before continuing, we have to take a side trip to explain some terminology. When we set margins, we use words like top, bottom, left, and right. because everyone agrees which edge of a piece of paper is the top edge, left edge, etc. We will use different words when we talk about the content area, because not all languages are written left-to-right, top-to-bottom.
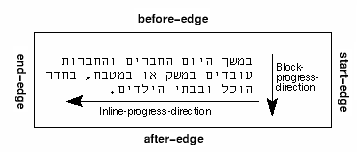
Just as with CSS, XSL FO considers your page to be made up of two classes of elements: block elements (such as paragraphs) which begin on a new line, and inline elements (such as bold, italic) which don't. You can think of FO's block-progress-direction as the order in which paragraphs are placed on a page. The before-edge precedes a paragraph; the after-edge follows it.
The inline-progress-direction is the order in which characters are placed within a line. The start-edge precedes a line, and the end-edge follows it.
For Hebrew, as shown below, the start- and end- edges are the opposite of those used for English. (Arabic is written similarly.)
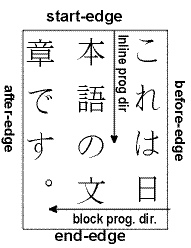
Japanese is sometimes written as shown below. The picture is from the XSL specification.
The advantage of using this new vocabulary is that it is
language-independent. If you want a heading to be at the opposite side
of the page from normal text, you set its text-align="end"
so it appears like this:
Headings set like the one above are unusual, and thus more likely to catch a reader's attention.
If the document is later translated to Arabic or Japanese, you will
be assured that the heading will still appear at the corresponding
“opposite side” of the text. There will be no need to go
through your document reversing left and
right or switching them with top and
bottom.
The cover page doesn't need a header or footer, so we don't need
to specify information for the region-before or
region-after. However, we must specify
the size of the region-body. We have done this by adding
the information shown in bold below.
<fo:simple-page-master master-name="cover"
        page-height="12cm"
        page-width="12cm"
        margin-top="0.5cm"
        margin-bottom="0.5cm"
        margin-left="1cm"
        margin-right="0.5cm">
        <fo:region-body
            margin-top="3cm"/>
</fo:simple-page-master>
The left and right pages will have a header and footer, so we must
specify the extent of the region-before and
region-after.
<fo:simple-page-master master-name="leftPage"
    page-height="12cm"
    page-width="12cm"
    margin-left="0.5cm"
    margin-right="1cm"
    margin-top="0.5cm"
    margin-bottom="0.5cm">
    <fo:region-before extent="1cm"/>
    <fo:region-after extent="1cm"/>
    <fo:region-body
        margin-top="1.1cm"
        margin-bottom="1.1cm" />
</fo:simple-page-master>

<fo:simple-page-master master-name="rightPage"
    page-height="12cm"
    page-width="12cm"
    margin-left="1cm"
    margin-right="0.5cm"
    margin-top="0.5cm"
    margin-bottom="0.5cm">
    <fo:region-before extent="1cm"/>
    <fo:region-after extent="1cm"/>
    <fo:region-body
        margin-top="1.1cm"
        margin-bottom="1.1cm" />
</fo:simple-page-master>
Important: The margins you set for the
region-body must be greater than or equal to the extents
of the the region-before and region-after
(and the region-start and region-end if you
use them - FOP does ot currently support them.). If you do something
like this:
<fo:region-before extent="1cm"/>
<fo:region-after extent="1cm"/>
<fo:region-body
    margin-top="0.20cm"
    margin-bottom="0.20cm" />
You can expect results like this:

Now that the page masters are defined, you may specify the the order in which a given set of these page masters will be used when it comes time to generate a sequence of pages.
The document we're building consists of a cover followed by the contents. That is, there are two sequences of pages: the cover page (which happens to be a sequence of exactly one page), followed by the “contents pages”, which is a sequence of alternating left and right pages.
While it's possible to define a page sequence that consists of the page master for the cover alone, we don't gain anything by doing so. (If we had several pages of front matter, as many books do, it might well be worth the effort.) Instead, we will concentrate on defining the sequence of master pages for the contents of the book. In plain English, the contents of the book consist of even-numbered left-hand pages followed by odd-numbered right-hand pages. This means that the inside front cover will be page two. The specification is shown below, with line numbers added for reference.
 1  <fo:page-sequence-master master-name="contents">
 2      <fo:repeatable-page-master-alternatives>
 3          <fo:conditional-page-master-reference
 4              master-reference="leftPage"
 5              odd-or-even="even"/>
 6          <fo:conditional-page-master-reference
 7              master-reference="rightPage"
 8              odd-or-even="odd"/>
 9      </fo:repeatable-page-master-alternatives>
10  </fo:page-sequence-master>
leftPage if
the page being generated has an even page number.rightPage if
the page being generated has an odd page number.While this is probably the most common page sequence, others are possible. If you had a single-sided document where all the pages looked like a right-hand page, but you wanted to set a maximum number of pages, you would use a page-sequence master as follows:
<fo:page-sequence-master master-name="example">
    <fo:repeatable-page-master-reference
       maximum-repeats="10" master-name="rightPage"/>
</fo:page-sequence-master>
The maximum-repeats attribute can also be applied to
repeatable-page-master-alternatives.
Other conditions that you may use in a
conditional-page-master-reference are:
page-position |
Use this page depending upon where it occurs in the page-sequence.
Valid values are first, last,
rest (i.e., not the first page), or any.
|
blank-or-not-blank |
Use this page master depending upon whether the page is blank
or not. Valid values are blank and not-blank.
The blank value is used to maintain parity;
for example, to generate a blank page to
ensure that a chapter always ends on an odd page number.
|
Now that the page masters and sequences are established, you can
start putting content into those pages. This is done by specifying
which page sequence to use, and which region the information should
flow into. Here's the beginning of the cover page. We use the
numeric entity code © for the copyright symbol.
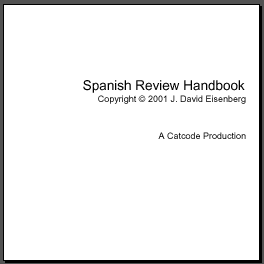
1 <fo:page-sequence master-reference="cover"> 2 <fo:flow flow-name="xsl-region-body"> 3 <fo:block font-family="Helvetica" font-size="18pt" 4 text-align="end"> 5 Spanish Review Handbook 6 </fo:block> 7 <fo:block font-family="Helvetica" font-size="12pt" 8 text-align="end" space-after="36pt"> 9 Copyright © 2001 J. David Eisenberg 10 </fo:block> 11 <fo:block text-align="end"> 12 A Catcode Production 13 </fo:block> 14 </fo:flow> 15 </fo:page-sequence>
<fo:page-sequence-master>; the word master
is part of the attribute name, not part of the element name!xsl-region-body
area of the page.Spanish Review Handbook) should
begin on a new line (<fo:block>) with the
specified font family and size. Note the text-align is
at the end edge of the line.Now that we have some content, we can render this page to print. If
you'd like to try this yourself, use the
fop.batbatch file for
Windows or the
fop.sh shell script for
Unix. (For home use, you may download the Apache Software
Foundation's FOP tool and
install it according to the instructions you find there.
On Linux, invoking the script by typing fop.sh spanish1.fo
spanish1.pdf produces a PDF file. (Windows users would type
fop.bat spanish1.fo spanish1.pdf.) To view the resulting
file, you need a program like Adobe
Acrobat Reader, which works on Linux, Macintosh, and Windows. Linux
users may also use xpdf, an
X-Window PDF viewer. The output from the document so far is shown below
in a reduced view.
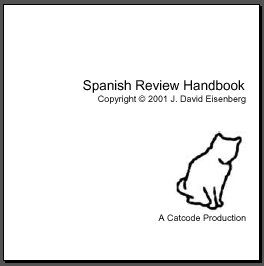
This obviously cries out for a graphic to make it look better.
The graphic is added as an external-graphic whose
src attribute is a valid URI for the image.
The additional elements are shown in bold below.
<fo:block font-family="Helvetica" font-size="12pt"
    text-align="end" space-after="36pt">
    Copyright #169; 2001 J. David Eisenberg
</fo:block>
<fo:block text-align="end">
    <fo:external-graphic src="file:images/catcode_logo.jpg"
        width="99px" height="109px"/>
</fo:block>
<fo:block text-align="end">
    A Catcode Production
</fo:block>
There. That's much nicer, isn't it?
Now let's start the content pages.
This is where we use contents, the other
page master sequence that we defined earlier.
In this case, we have to put information into the
xsl-region-before
and xsl-region-after as well as the xsl-region-body.
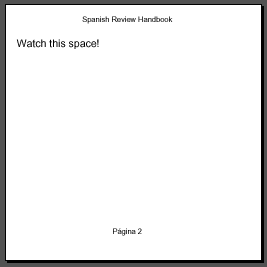
1 <fo:page-sequence master-reference="contents" initial-page-number="2"> 2 <fo:static-content flow-name="xsl-region-before"> 3 <fo:block font-family="Helvetica" font-size="10pt" 4 text-align="center"> 5 Spanish Review Handbook 6 </fo:block> 7 </fo:static-content> 8 9 <fo:static-content flow-name="xsl-region-after"> 10 <fo:block font-family="Helvetica" font-size="10pt" 11 text-align="center"> 12 Página <fo:page-number /> 13 </fo:block> 14 </fo:static-content> 15 16 <fo:flow flow-name="xsl-region-body"> 17 <fo:block font-size="14pt"> 18 Watch this space! 19 </fo:block> 20 </fo:flow> 21 </fo:page-sequence>
contents master name. Start page numbers at 2.<fo:static-content> rather than a
variable <fo:flow> to fill the
xsl-region-before.<fo:static-content>.
NOTE: Line 12 shows how to insert the
current <fo:page-number/>.
Entity á represents á. xsl-region-body
in this page sequence.Here's the result; see the source file
In the next set of notes, we'll show you how to use XSLT to make it much easier to create the FO elements. You'll also learn how to put lists and tables into your documents.